Create a blog a blog is one job that is easy to do, especially if we create a blog on blogger. Through several steps we have to have a blog and would have online.
On this post Blogger Mendalo will explain in details about how to create a blog from scratch until to the other settings until the blog appear attractive.
What is a blog?
A bit let us know what is a blog? Understanding blog according to the Wikipedia website, a blog is short for web log, said web logs in this case to name an application the website contents are likely to be shaped on text, text and or articles in general text or text displayed in the form of a sequence starting from posts/recent posts to post/the longest inscriptions which have been published on his blog.
The goal of making the blog a blog, be it the free version or the paid version is the blog as a means to share, share information, share knowledge sharing, share the experience. This blog is also widely used as a means of online business. Information obtained from many, many States that by using the blog has a lot of that can be monetized through Monetize provided by google.
On the above article we have gained one explanation that blogs can be created in blogger/blogspot. But actually the blog not only can create a blog on blogger, but can also be made using multiple platforms, including: Wordpress, Weebly, Blog dot com, and many more others. But according to blogger Mendalo the most easy is to create a blog on blogger.
To have a blog of course we have to go through several stages in making it, and the following Blogger Mendalo will try to explain the stages in making blog:
1. Preparation phase
To create a blog surely we are required to have an internet network the following devices and equipment computer used, and another power to turn on the computer. There are network devices and the internet, if there is no electricity then make will not be resolved.
2. Have an email
How to create a Gmail account. After we passed the stage of preparations, then we are required to have an email, if it turns out you don't have email then we must first create the email.
To make email easier, so please use Gmail, because if we create a blog on blogger, with just one login then we will be able to easily manage the blog and also easier to check incoming email on Gmail. But it doesn't hurt also if we use email in addition to Gmail.
There may still be a visitor of this blog who feel difficulties to create an email in Gmail, than that will be described below in brief.
To create an email,
Please go to Gmail.com
Continue by clicking Create an account
Please use the form provided in accordance with your data
Name:
Choose your name:
Create a password:
Confirm you password:
Birthday:
Gender:
Mobil phone:
You current email address:
And other fields. Please follow the steps. Because if it is described here, the post would be too long.
If there is still Trouble in the making of a Gmail account, please ask you via the comments field.
3. Create a blog on blogger
How to create a blog on blogger. After we go through 2 stages above, let's move on to the third stage, namely to create a blog on blogger
The blogger is not difficult to make, please type the first blogger/blogspot, afterwards you will be presented a menu of login, login with your email and password if your position is not logged.
Once we have successfully logged in, then it will usually show up a menu of options the use of identity profile, in this option we can select one profile or profile Google + Blogger. If it is, click continue to continue with bloggers
After that we'll see a blog creation page, click Create a new Blog
Proceed by filling in the columns that are available on the Create a new blog page, i.e. with filling:
-"Title" in that column you can enter the name of your blog: e.g. Blogger_Mendalo
-"Address" in the column that you can fill with your blog's url, such as bloggermendalo (without spaces), make sure the url you typed is not yet there are people who create blogs with URLs, because if it is there then you cannot make a blog with the url.
-"Templates" on the template, you can choose the style and look of the template has been provided, please scroll down to see it.
-If it is, continue with the click Create blog!
-Good luck and I congratulate, you already have a blog
4. Make a post
How to create the post in blogger. Now you have gone through 3 stages that have been completed, and you already have a blog with a steady look. But your blog is very unfortunate yet contains the posts, why not yet contain the posts? The answer: Because the blog was just created.
To make a post on blogger is very easy. That is, it is enough to click "New Post" then fill the post title and post content also is required, proceed click Publish.
5. Submit blog to search engines
How to submit blog to search engines. You now have a blog and have after following the fourth stage, then you have also have a post on his blog. But unfortunately, this time your blog has yet to be discovered by the search engines, because you haven't done submit blog to search engines, especially google
From it lets follow the steps submit blog url to google.
To work on submit blog url to google first, please type in the add url on the search engines, and then locate the Submit URL – Google, then enter your blog's url e.g. bloggermendalo.blogspot.com and click Submit Request. Then do verify by entering the code verify that exists in google wbmastertool to your blog. Or it could also do verify via email. If the forefront has been selasai and success, then wait a few days your blog will be found by search engines. It's just that I do not know on the blog to many sequence can be found.
More clear regarding this discussion, you bias found in other posts on the blog Blogger Mendalo.
6. Create interesting blog
How to make an interesting blog. To make your blog interesting, you appear biased conduct by changing the color of the template, change the look of the template, or replace templates that already made it interesting.
If you want to explore about the blog, we recommend that you do not change the template that is already made attractive by others, but you have to work on your own how to display your blog become more interesting, because in this way you gain a lot of knowledge.
A little secret so that I will have to blog to appear attractive. To change the color of the blog, you can simply do a custom template in the Template section > Customize. On that page you can change the appearance of color blog, size and type of font, font color, lay out, backgrounds and also you can add css to your taste
7. Make Money From Blog
How to Make Money From a Blog? In this section you can do after your blog actually get visitors, because of visitors that our blogs will be able to make money. If the blog does not have visitors how probably will be able to earn an income. So that the blog has a lot of visitors, of course, our blog has a very good SEO positions, because with a good SEO, then the blog will be found by seekers of information through search engines.
Then how can I make the blog can be found by seekers of information through search engines?
This course should have some of our blog posts, and post-the post is a unique article, that article can occupy a good search engine position. Say, when we type in "how to create a blog on blogger" on a search engine, then our post about "how to create a blog on blogger" will appear on the first page of the number 1 search engine. If there were 1000 people who search for information by typing in how to create a blog on blogger, then there are at least 10 people who open the pages of our blog. Good luck, if 1000 people that everything is opening up how to create a blog on blogger on our blog page. Fingers crossed.
Back to Make Money From Blog. Specifically for blogs that are created on the blogger, the blog owner can easily earn revenue via the blog with how to register a blog on Google AdSense, certainly after following the rules given by Google AdSense. To make money from Google AdSense that we have to do is just put ads from Google AdSense on the blog. When Google AdSense ads can be mounted on a blog? After we were accepted into the Google AdSense publisher.
What are the requirements for being a Google AdSense publisher? To make it more clear, please look at the official page of Google AdSense.
There is one more question. Does this blog have become publisher AdSense?
When I made this post, Blogger Mendalo not yet registered into the Google AdSense publisher. Hopefully in the near future I will register this blog into Google AdSense publisher and with the hope that the Google AdSense team can take it. Please prayer that this blog could be a Google AdSense publisher best.
So a post about How to make a blog on BlogSpot, hopefully this post can provide benefits to many people around the world. One message for you, before leaving this page please
Home » Archives for January 2016
Adding read more to blogger posts
As a beginner blogger like me, make readmore on the blog post is not easy. As with the bloggers who have advanced, various styles and and forms readmore they can they can make, ranging from read more to blogger with thumbnails, read more auto bloggers, animated read more button bloggers, read more image bloggers, read more button in blogger, read more with script code, read more just looked title, and how to make other readmore.
What is read more bloggers?
Read more is one of the beheading of posting an article on blogger whose function is to minimize the look on a page posting so that the post is not seen as a whole without having to click on the word "read more". By adding readmore on each post so if we open on its home page on the blog, the blog blog posts are only visible piece of sentences.
To be more clear, let's look at the picture below:

To make readmore the easiest blogger, in this case the sign edit html in blogger template is:
- How are you've logged into blogger? If not we log into your account mai blogger
- Create a new post, tulisah title of the post, and post content.
- Change the mode of posting of html to Compose
- Determine where you would have cut the sentence by way of placing the cursor, and then click Insert Jump break, please see the picture:
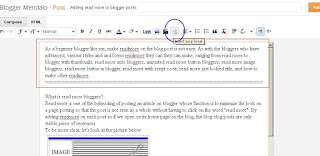
Caption readmore:
> The blue circle is the button that must be clicked to display readmore
> Blue colored box is displayed on the sentence that area readmore
- Continue with a click Publish
Have a look, your post has been truncated to read more.
You must have opened this post, where the comments you ....?
What is read more bloggers?
Read more is one of the beheading of posting an article on blogger whose function is to minimize the look on a page posting so that the post is not seen as a whole without having to click on the word "read more". By adding readmore on each post so if we open on its home page on the blog, the blog blog posts are only visible piece of sentences.
To be more clear, let's look at the picture below:

To make readmore the easiest blogger, in this case the sign edit html in blogger template is:
- How are you've logged into blogger? If not we log into your account mai blogger
- Create a new post, tulisah title of the post, and post content.
- Change the mode of posting of html to Compose
- Determine where you would have cut the sentence by way of placing the cursor, and then click Insert Jump break, please see the picture:

Caption readmore:
> The blue circle is the button that must be clicked to display readmore
> Blue colored box is displayed on the sentence that area readmore
- Continue with a click Publish
Have a look, your post has been truncated to read more.
You must have opened this post, where the comments you ....?
how to submit blogger sitemap to bing
How to submit a blogger sitemap to Bing. Bing is a search engine can be used by seekers of information on the Internet. Bing is a search engine under the auspices of Microsoft.
Without discussing at length about what that bing, we should continue to discuss the appropriate title is How to submit blogger sitemap to Bing.
To submite blogger sitemap, you first have to submite site to bing, if it has been doing the job site to bing submite then you can do submite sitemap.
To do submite blog url to bing is:
- Go to the website bing
- Find submite site url
- Add your blog url in the column Type the URL of your homepage
- Enter the code below Type the characters from the picture in the text box
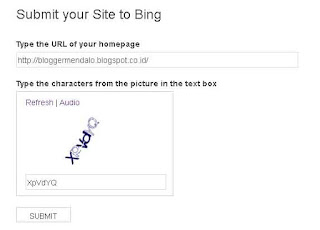
- Click submite
- Continue to click Great! Sign me up

After you sign in / signup then the next step you can melakkan submite bloggers to bing webmastertool
- Bing login page will open, please login to bing with your account, if do not have an account Sign Up
- Once you are logged in, you will find a page Add a site again, the column is usually written url your url which has been incorporated
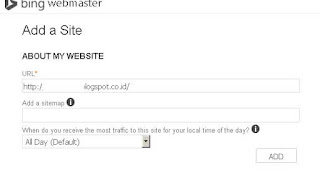
- Click the Add
- Then you will see the verification page, please copy verification code bing webmaster
- Save the template
- Then leave a comment below
Without discussing at length about what that bing, we should continue to discuss the appropriate title is How to submit blogger sitemap to Bing.
To submite blogger sitemap, you first have to submite site to bing, if it has been doing the job site to bing submite then you can do submite sitemap.
To do submite blog url to bing is:
- Go to the website bing
- Find submite site url
- Add your blog url in the column Type the URL of your homepage
- Enter the code below Type the characters from the picture in the text box

- Click submite
- Continue to click Great! Sign me up

After you sign in / signup then the next step you can melakkan submite bloggers to bing webmastertool
- Bing login page will open, please login to bing with your account, if do not have an account Sign Up
- Once you are logged in, you will find a page Add a site again, the column is usually written url your url which has been incorporated
- Column Add a sitemap, submit your url sitmap. Example: http://bloggermendalo.blogspot.co.id/sitemap.xml,
replace bloggermendalo.blogspot.co.id with your blog url

- Click the Add
- Then you will see the verification page, please copy verification code bing webmaster
<meta name="msvalidate.01" content="ABCDEFGHIJKLMNOPQRSTUVWXYZ1234567890" />then paste into your template blogger, a way to open blogger> templates> edit html, look for the code & lt; head & gt ;, place the verification code below
- Save the template
- Then leave a comment below
How to add blogger description in header blogger
Blogger Description is a short description of the content of the blog, about what the content of these blogs, talking about what the blog. Description of the blog is also very influential on seo, usually to improve seo blog, in addition to putting on the blog description header blog owner is also required to add meta descripsi blog on blogger template.
For this time we will discuss on the blog to add a description in the header. please see the example in the results in the following figures:

To add a description to the header is Blogger;
- As usual, must login to blogger
- Go to the Settings> Basic
- Find the description, and then click Edit, after click edit then would appear an empty city. nah, that's where we fill the blog description that will be displayed on the blog header
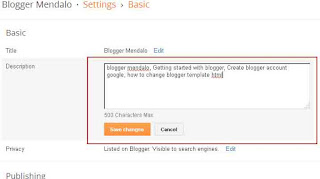
- If you have, please click SAVE
to add meta descriptions on the blog template is
- You are still in a position login
- Open the template, edit html
Save the template
For this time we will discuss on the blog to add a description in the header. please see the example in the results in the following figures:

To add a description to the header is Blogger;
- As usual, must login to blogger
- Go to the Settings> Basic
- Find the description, and then click Edit, after click edit then would appear an empty city. nah, that's where we fill the blog description that will be displayed on the blog header

- If you have, please click SAVE
to add meta descriptions on the blog template is
- You are still in a position login
- Open the template, edit html
- Discover the code & lt; head & gt;add the following code below:
& lt; meta content = "blogger mendalo, Getting started with bloggers, bloggers Create a Google account, how to change blogger template html 'name =' description '/ & gt;
Save the template
how to add recent post in blogger
how to add recent post widget for blogger. Recent posts widget is a widget that serves to display the latest posts on the bloggers. recent post widget displays usually last post up on some posts with a countdown sequence. Eg admin made a post a day one post means the order of the post is a post today by posting the tenth day is past.
For a recent post widget placement is usually located on the right side or the left sidebar.
To recent post widget is to allow visitors to search for the latest posts.
Now how do I make recent post widget in question?
To make recent post on blogger widget is:
- Login to bloggers, if not logged
- Open layout
- Add gadget
- Find Feed, then add
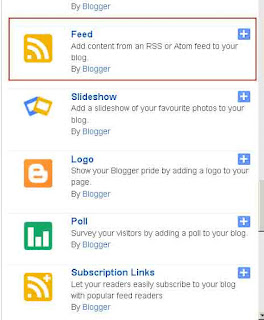
- Perform setting Configure Feed by adding your blog url in the field Feed URL by adding feeds / posts / default

- Click save
See the results, and please leave a comment below yes ...
For a recent post widget placement is usually located on the right side or the left sidebar.
To recent post widget is to allow visitors to search for the latest posts.
Now how do I make recent post widget in question?
To make recent post on blogger widget is:
- Login to bloggers, if not logged
- Open layout
- Add gadget
- Find Feed, then add

- Perform setting Configure Feed by adding your blog url in the field Feed URL by adding feeds / posts / default

Example: http://bloggermendalo.blogspot.com/feeds/posts/defaultbloggermendalo.blogspot.com replace with your blog address
- Click save
See the results, and please leave a comment below yes ...
How to customizable blogger templates
Blogger template is the design of shapes and styles that can be used on the blog page to display pages, headers, footers, and other widgets. The bottom line is desaign blogger blogger templates that can be used to display the entire contents of the blog, either image or text.
A lot of designers who have managed to create a blog template with different styles, ranging from a simple blogger template, blogger template full color, Cool blogger templates, blogger templates cute and so forth.
So we want to use which? Depending on the needs and tastes of each.At the bloggers themselves have many provides a variety of templates which of course you can get for free, to use the templates provided by blogger (blogger default template), to use / change the default template blogger is very easy, namely:
- Login to blogger
- Select a template, specify your choice on a view that looks at page template
- Save Template
We return to the post title is How to customizable blogger templates. You can customize the templates blogger.
Easy to customize blogger templates, to customize the template blogger simply:
- Click on Customize
- On that page there are several customization options, namely Background, Adjust widths, Layout, Advanced
 |
| How to customizable blogger templates |
- In the Background section, you can change the background color by using the color options available
- In the Adjust widths, you can change the size of the blog, blog width, width and other widgets
- In pilhan layout you can choose the shape and design or layout obedient
- In pilhan advaced, you can customize at:
> Background consisting of Outer Background, Main Background, Header Background
> Link, you can customize the color of the link Colour, Colour Visited, Hover Colour
> Blog Title, you can specify the typeface on the blog title, blog title Color
> Blog Description, you can change the color description of the blog
> Tabs Text, you change the font and size, Text Colour and Colour Selected
> Background Tabs you can change the Background Color Menu Tab and color Selected Colour
> Post Title, you can change the typeface on the title of the post
> Date Header, you can change the wText Colour, Background Colour, Text Font
> Post footer, you can change the colors Text Color, Background Color, Shadow Colour
> Gadget, you can change the typeface on the Title Font, Colour Title and Alternative color
> Image, you can change the background color of Colour, Colour Border, Caption Text Color
> Accent, you can change Line Colour, Colour Border Tabs
> Car Button color, you can change the Mobile Button Color
> Add CSS, you can add columns Add custom css CSS. (for this one I've never tried it)
When finished customize the template you then do not forget to save the work by clicking Apply to BlogCreate search box blogger
Search box bloggers is one of the menu that is needed on the blog. With the menu Search box bloggers visitors will easily find the article or an existing image blog. In general searc box widget is placed on the left, top, header, and some are put on the menu bar.
At this post we will discuss about how to make the Search box without editing html, using the facilities provided by bloggers:- Let's login to blogger
- Open Layout
- Add gadget
- Find the Add Search Box
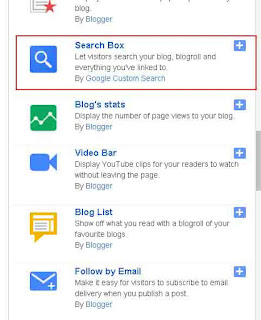
- Perform Configure Search Box, by replacing the title you want, or let it also be,
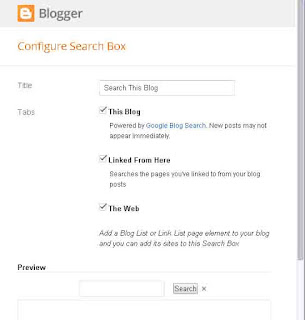
- At Tabs, you can pick and choose your piihan by way mengilangkan or give a tick on: This Blog, Linked From Here, The Web
- Save the widget and see the results
- To move the widget simply by shifting the widget at the position you want
how to center pages on blogger
Once we have and have had a lot of posts and when we look around and looked at our own blog and compared with bllog owned or websites that are well known, was very much difference between our own blog and other blogs. Maybe you've noticed a few blog posts that have a page with a variety of design and display, among them there are bloggers who post center adan arrangement also with flat display left and right, there is also the left flat.
On this occasion I will try to make a post that talks about how to make post pages blogger with flat display left and right, align left, align right and center.
To make all of them turned out to be very easy, the way is:
- Make sure you've logged into Blogger
- Create a post, or edit existing posts
- See button / menu on a page posting:
- Select All on the content of your posting
- Change the display becomes compose

- Select the position you want to be centered, align left, align right, or left and right flat
- Publish
- See the results
- Good luck
- If you find this post, do please comment
thank you
On this occasion I will try to make a post that talks about how to make post pages blogger with flat display left and right, align left, align right and center.
To make all of them turned out to be very easy, the way is:
- Make sure you've logged into Blogger
- Create a post, or edit existing posts
- See button / menu on a page posting:
- Select All on the content of your posting
- Change the display becomes compose

- Select the position you want to be centered, align left, align right, or left and right flat
- Publish
- See the results
- Good luck
- If you find this post, do please comment
thank you
how to create categories in blogger
how to create categories in blogger?
how to add labels to blogger?
how to add categories to blogger?
how to create categories on blogger?
ll will be answered here
category serves to classify the blog post on the blog based on a particular label, so that later can facilitate the search for messages that have one group of categories. For example in the blog there are several posts about BLOGGER, then when we click on the label BLOGGER all the posts of bloggers will be displayed.
Then how to label the post in question?
To give the category of the post, we can do by way of:
1. Create a post
2. Give the Post Title
3. Write a post content
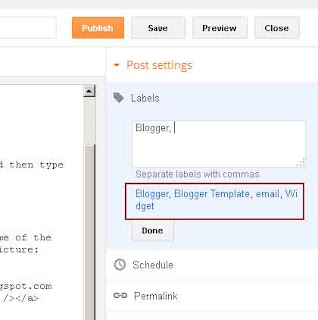
4. Look to the right of the post page, there is no lettering Post settings. Please click on the Label, and then type the name of the desired kategory, such as Blogger and then click DONE
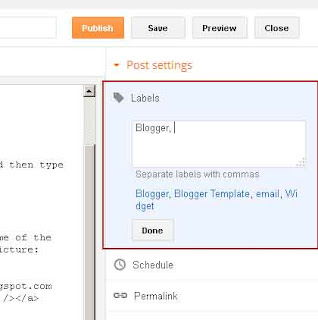
5. Continue to click Publish
6. See the results
If there has been a post with the category name already exists, then you do not need to write down the name of the category, but simply by clicking on the name of the label in the box labeled, clearer let's look at the picture:
How do I show Widged category on the blog
Once we have a few posts on the blog, and has given him the label then we must show proficiency level label widget so that visitors easily search for posts based label. For example, visitors will be looking for posing on BLOGGER then with one click on the word BLOGGER in the widget, all the posts about BLOGGER will be shown.
Well, to make a label bloggers are:
1. Click the Layout
2. Add a Gadget

3. Find Labels, then Add next Perform the Configure Labels on the configuration page. Define Title, Show, sorting, and display
4. Proceed with Save
how to add labels to blogger?
how to add categories to blogger?
how to create categories on blogger?
ll will be answered here
category serves to classify the blog post on the blog based on a particular label, so that later can facilitate the search for messages that have one group of categories. For example in the blog there are several posts about BLOGGER, then when we click on the label BLOGGER all the posts of bloggers will be displayed.
Then how to label the post in question?
To give the category of the post, we can do by way of:
1. Create a post
2. Give the Post Title
3. Write a post content
4. Look to the right of the post page, there is no lettering Post settings. Please click on the Label, and then type the name of the desired kategory, such as Blogger and then click DONE

5. Continue to click Publish
6. See the results
If there has been a post with the category name already exists, then you do not need to write down the name of the category, but simply by clicking on the name of the label in the box labeled, clearer let's look at the picture:

How do I show Widged category on the blog
Once we have a few posts on the blog, and has given him the label then we must show proficiency level label widget so that visitors easily search for posts based label. For example, visitors will be looking for posing on BLOGGER then with one click on the word BLOGGER in the widget, all the posts about BLOGGER will be shown.
Well, to make a label bloggers are:
1. Click the Layout
2. Add a Gadget

3. Find Labels, then Add next Perform the Configure Labels on the configuration page. Define Title, Show, sorting, and display
4. Proceed with Save
How to remove hyperlink comments in blogger
How to remove hyperlink comments in blogger. For those who already have a blog, of course, one advantage is that the blog blog owner has many visits. A wide range of resources and efforts undertaken by the blog owner, ranging from the well optimization seo onpage optimization, optimization of title, description optimization, meta optimization, optimization and other optimization hyperlink.
In addition to performing inpage optimization, any business that can be done to improve the visitor is by commenting on other people's blogs or bisajuga sign the guest book on other blogs. By leaving comments on other blogs means that at least we have had the potential visitors who will visit our blog. Who is he? He is the owner of the blog that we visited. There is a possibility after the blog owner saw anyone leaving a comment on any post, the blog owner will see what the content of the comments left, and blog owners will see exactly who has visited, the blog owner will see if he has a blog or website? Oh it turns out to have a blog / website, the blog owner will be curious as to what is actually her blog, so the blog owner will try to open the blog. And what if it turns out the blog where we commented that having thousands of visitors? If a blog comment that we have thousands of visitors, it is possible that hundreds of the end will visit our blog. It is all of our expectations and also the possibilities of it ....
There are many ways in which the people commenting on the blog, one that is often made is to leave the active hyperlink in the comments field. Active hyperlink to the comments in the opinion may adversely affect the seo blog where we commented, we often encounter some blog owners remove comments that include an active hyperlink on their blog.
Well, here mendalo bloggers will try to create a guide for how to remove the active hyperlink to the comments in an automated way.
1. Let's login to blogger2. Open Template> edit html
3. Find the code </body>
4. add the following code above </body>
<script type='text/javascript'>
//<![CDATA[
function blockLinks(parentID, children) {
var parent = document.getElementById(parentID),
content = parent.getElementsByTagName(children);
for (var i = 0; i < content.length; i++) {
if (content[i].innerHTML.indexOf('</a>') !== -1) {
content[i].innerHTML = "<mark>Unfortunately you have put a hyperlink here</mark> <i><p>Which causes your comment deleted automatically</i>";
content[i].className = "spammer-detected";
}
}
}
blockLinks('comment-holder', 'p');
//]]>
</script>
The result will be like this
 |
How to remove hyperlink comments in blogger |
5. save Tempalate
6. See the results
7. Do not forget to leave a comment below yes ..... :-)
How to send large files with gmail
How to send large files with gmail. Email is one of the media to send and receive documents in the form of images, text or otherwise. If in ancient times we send the news took a few days, because the media use is a media delivery (chargo). It may be that today we are sending a letter, then a week later the receiver can receive our epistle. With the development of technology, now we can send documents with just a few seconds would be accepted by the recipient.
There are some emails which are often used by users include yahoo, gmail, ymail.
If we glimpse on page email delivery, then that is visible is a blank page that is used to type the message to the recipient. But what if that will be sent in the form of scanned document or photo ....?
Well, here is the way by sending an email in the form of scanned document or photo with gmail.com.
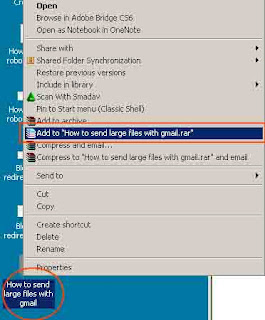
1. If the file to be sent to a large size, then create a folder to put the files on it, and in that folder compressed using winrar or winzip. The trick is: Right-click on the folder, then Add to NAME YOUR FOLDER, more details we refer to the image below.
2. After shaped winrar file, for example: How to send large files with gmail.rar, please open your gmail
3. Click Compose
4. Write the email recipient in the To:
5. Write the Subject of the email that will be sent
6. On a blank page to write news, please fill in with the news that you convey example: here I send files How to send large files with gmail.rar on behalf
7. Find the file Insert marks usinng Google Drive, select upload, select a file from your computer, an look for the folder where you saved the file How to send large files with gmail.rar, then click upload

8. Click Send
If still in doubt whether the file actually sent or not, please contact recipients via your mobile phone.
There are some emails which are often used by users include yahoo, gmail, ymail.
If we glimpse on page email delivery, then that is visible is a blank page that is used to type the message to the recipient. But what if that will be sent in the form of scanned document or photo ....?
Well, here is the way by sending an email in the form of scanned document or photo with gmail.com.
1. If the file to be sent to a large size, then create a folder to put the files on it, and in that folder compressed using winrar or winzip. The trick is: Right-click on the folder, then Add to NAME YOUR FOLDER, more details we refer to the image below.

2. After shaped winrar file, for example: How to send large files with gmail.rar, please open your gmail
3. Click Compose
4. Write the email recipient in the To:
5. Write the Subject of the email that will be sent
6. On a blank page to write news, please fill in with the news that you convey example: here I send files How to send large files with gmail.rar on behalf
7. Find the file Insert marks usinng Google Drive, select upload, select a file from your computer, an look for the folder where you saved the file How to send large files with gmail.rar, then click upload

8. Click Send
If still in doubt whether the file actually sent or not, please contact recipients via your mobile phone.
Blogger redirect 404 to homepage
Everyone who has a blog desirous that articles that have been posted on the blog can be found by search engines. What if the posting has been in the index by search engines and intentionally or unintentionally we change the url or delete such posts? When the posting has been deleted / changed address URL, and then there are potential visitors who find url long (before being removed / replaced),then when the URL is opened the message "Sorry, the page you were looking for in this blog does not exist. "
If visitors find such a message, there may be some visitors who feel disappointed. because they expect to find articles that they are looking for.
Well, to ease the disappointment of the visitors who come across an error message as above, then we can replace the message with a redirect to the main page search blogs.
Here's how to switch the 404 on blogger
- Login to your blogger account
- Settings> Search preferences
- Find Errors and redirections> Custom Page Not Found
- Click Edit, then will pop up a box
- Fill in the box with the following text:
Click Save Change
That post about Blogger redirect 404 to homepage, May be useful
 |
| Sorry, the page you were looking for in this blog does not exist |
If visitors find such a message, there may be some visitors who feel disappointed. because they expect to find articles that they are looking for.
Well, to ease the disappointment of the visitors who come across an error message as above, then we can replace the message with a redirect to the main page search blogs.
Here's how to switch the 404 on blogger
- Login to your blogger account
- Settings> Search preferences
- Find Errors and redirections> Custom Page Not Found
- Click Edit, then will pop up a box

- Fill in the box with the following text:
Sorry, the page you are looking for was not found. You will be redirected to the HomePage. <script type = "text/javascript">
//bloggermendalo.blogspot.co.id/
setTimeout(function() {
location.pathname= "/"
}, 2000);
</script>
Click Save Change
That post about Blogger redirect 404 to homepage, May be useful
How to add robots.txt to blogger
How to add robots.txt to blogger. Robots.txt is a text file that is found on a website or blog to instruct the robot on search engines so that the website can be crawled by the search mensin. (roughly like that sense robots.txt), if pengrtian robots.txt less true, please straighten in the comments field.
At blogger also provides the facility to add robots txt, but by default robots.txt at blogger is empty. And blogger warned us to be careful in adding robots.txt, because if one in adding robots.txt, then the blog will be ignored by the search engine (blog can not be found by search engines.
Here is how to add a robots.txt on blogger:
- Please go to "google blogger login account", and do login with your email and password
- Settings> Search preferences
- Find Crawlers and indexing, and underneath there is a Custom robots.txt
- In the default position, robots.txt disable status. And to use it please click Edit
- After clicking edit, provide a check on Yes, and will show an empty box that you must fill in:
- Replace bloggermendalo.blogspot.co.id with your blog url
- Continue to click the Save Change
Hopefully, after the adding a robots.txt file, our blog will be easily crawled by search engines
At blogger also provides the facility to add robots txt, but by default robots.txt at blogger is empty. And blogger warned us to be careful in adding robots.txt, because if one in adding robots.txt, then the blog will be ignored by the search engine (blog can not be found by search engines.
Here is how to add a robots.txt on blogger:
- Please go to "google blogger login account", and do login with your email and password
- Settings> Search preferences
- Find Crawlers and indexing, and underneath there is a Custom robots.txt
- In the default position, robots.txt disable status. And to use it please click Edit
 |
| How to add robots.txt to blogger |
- After clicking edit, provide a check on Yes, and will show an empty box that you must fill in:
User-agent: Mediapartners-Google
Disallow:
User-agent: *
Disallow: / search
Allow: /
Sitemap: http://bloggermendalo.blogspot.co.id/feeds/posts/default?orderby=UPDATED
- Replace bloggermendalo.blogspot.co.id with your blog url
- Continue to click the Save Change
Hopefully, after the adding a robots.txt file, our blog will be easily crawled by search engines
how to add Featured post widget blogger
Feature post is a widget that displays one or more posts that have been chosen by website owners to display in the widget. But sometimes there are also some features posts are made at random, but specifically for a future post to display random posts are usually called random post. There are so many styles and shapes are used by website owners to display the features of the post, there is a feature that displays the post with a slider (feature post run), feature animation or a post with another post feaure style.
Nowadays bloggers have been providing widget feature post, although the feature post provided by still modest but at least have memperudah blog owner to make a feature post without changing the code of an existing template, just with a few clicks we have been able to have a widget feature post and post feature is also very easy to be moved to the widget to the left, right or center.
Here's how to create a feature post without editing html.
- If you have not logged in, please login to blogger
- Go to Layout> Add a Gadget
- Click Featured post and add
- Make the settings on the Configure page featured post your liking. On that page, you can specify the Show Post Title, Show image, then choose the posts to be displayed in the select a featured post.
- Then save your work by clicking Save
To move a widget featured post position, simply click and drag and move it in the desired position.
Nowadays bloggers have been providing widget feature post, although the feature post provided by still modest but at least have memperudah blog owner to make a feature post without changing the code of an existing template, just with a few clicks we have been able to have a widget feature post and post feature is also very easy to be moved to the widget to the left, right or center.
Here's how to create a feature post without editing html.
- If you have not logged in, please login to blogger
- Go to Layout> Add a Gadget
- Click Featured post and add
- Make the settings on the Configure page featured post your liking. On that page, you can specify the Show Post Title, Show image, then choose the posts to be displayed in the select a featured post.
 |
- Then save your work by clicking Save
To move a widget featured post position, simply click and drag and move it in the desired position.
How to add related posts in blogger
How to add related posts in blogger. The function of the related post is to display related posts. In general, future post made based label, for example: if we make posts with label bloggers and when such posts open the post that labeled other bloggers will be shown on the related post. Benefits related post for visitors is to allow visitors to find other articles that relate to the post that is being read.
Well, then how do I make a related post on blogger?
Here is how to make the related post on blogger
- Please login to blogger
- Go to Template> Edit HTML
- Search code:
<!--RELATEDPOSTMULAI-->
<style>
#related-posts{float:left;width:100%;border-bottom:0 solid #888;border-top:0 solid #88daed;margin:5px 0 10px;padding:15px 0 10px}#related-posts .widget h2,#related-posts h3{font:18px Oswald;color:#000;text-transform:none;margin:0 0 10px;padding:0}#related-posts a{color:#16A1E7;font:12px Verdana}#related-posts li{background:url(https://blogger.googleusercontent.com/img/b/R29vZ2xl/AVvXsEg8fuDoQrDkmgsr_72V_0iYqmtnIfndZv0oY-KPZ4ShmUfkDcUi4BSx4EcVjfW-6KmIHMn435ZMfpOsLMrE9HdrF_IK0Gx-8SGYhBEEc4cHZxZGYYumu0reY3uso74CsyEkX2KfdwQgmeE/s1600/bullet-list.gif) no-repeat 0 10px;text-indent:0;line-height:1.3em;border-bottom:1px dotted #ccc;margin:0;padding:3px 0 8px 12px}#related-posts a:hover{color:#c00;text-decoration:none}#related-posts .widget{margin:0;padding:0}#related-posts ul{list-style:none;margin:0;padding:0}
</style>
<script type='text/javascript'>
var relatedpoststitle="<h4>Artikel Mirip denngan : <a expr:href='data:post.url'><data:blog.pageName/></a></h4>";
</script>
<script type='text/javascript'>
//<![CDATA[
var relatedTitles=new Array();var relatedTitlesNum=0;var relatedUrls=new Array();function related_results_labels(c){for(var b=0;b<c.feed.entry.length;b++){var d=c.feed.entry[b];relatedTitles[relatedTitlesNum]=d.title.$t;for(var a=0;a<d.link.length;a++){if(d.link[a].rel=="alternate"){relatedUrls[relatedTitlesNum]=d.link[a].href;relatedTitlesNum++;break}}}}function removeRelatedDuplicates(){var b=new Array(0);var c=new Array(0);for(var a=0;a<relatedUrls.length;a++){if(!contains(b,relatedUrls[a])){b.length+=1;b[b.length-1]=relatedUrls[a];c.length+=1;c[c.length-1]=relatedTitles[a]}}relatedTitles=c;relatedUrls=b}function contains(b,d){for(var c=0;c<b.length;c++){if(b[c]==d){return true}}return false}function printRelatedLabels(a){for(var b=0;b<relatedUrls.length;b++){if(relatedUrls[b]==a){relatedUrls.splice(b,1);relatedTitles.splice(b,1)}}var c=Math.floor((relatedTitles.length-1)*Math.random());var b=0;if(relatedTitles.length>1){document.write("<h3>"+relatedpoststitle+"</h3>")}document.write("<ul>");while(b<relatedTitles.length&&b<20&&b<maxresults){document.write('<li><a href="'+relatedUrls[c]+'">'+relatedTitles[c]+"</a></li>");if(c<relatedTitles.length-1){c++}else{c=0}b++}document.write("</ul>");relatedUrls.splice(0,relatedUrls.length);relatedTitles.splice(0,relatedTitles.length)};
//]]>
</script>
<!--RELATEDPOSTWESLAH-->
- Continue to find the code
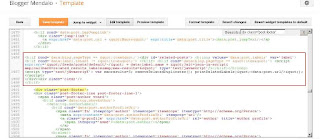
<b:if cond='data:blog.pageType == "item"'><div id='related-posts'> <b:loop values='data:post.labels' var='label'> <b:if cond='data:label.isLast != "true"'> </b:if> <b:if cond='data:blog.pageType == "item"'> <script expr:src='"/feeds/posts/default/-/" + data:label.name + "?alt=json-in-script&callback=related_results_labels&max-results=6"' type='text/javascript'/></b:if></b:loop>
<script type='text/javascript'> var maxresults=5; removeRelatedDuplicates(); printRelatedLabels("<data:post.url/>"); </script>
</div><div class='clear'/>
</b:if>
View image:
- Click SAVE TEMPLATE
To create a related post responsive / mobile version, then we have to add the code:
@media screen and (max-width:320px){.related-posts ul{padding:0;list-style-type:none}.post blockquote{margin:5px;background:#C3C3C3;font-family:"Arial",Verdana;font-style:italic}}.post blockquote{-webkit-touch-callout:text;-webkit-user-select:text;-khtml-user-select:text;-ms-user-select:text;-moz-user-select:text}.post{-webkit-touch-callout:none;-webkit-user-select:none;-khtml-user-select:none;-ms-user-select:none;-moz-user-select:none}
above
Well, then how do I make a related post on blogger?
Here is how to make the related post on blogger
- Please login to blogger
- Go to Template> Edit HTML
- Search code:
]]></b:skin>Add the following code below
]]></b:skin>Add the following code below
<!--RELATEDPOSTMULAI-->
<style>
#related-posts{float:left;width:100%;border-bottom:0 solid #888;border-top:0 solid #88daed;margin:5px 0 10px;padding:15px 0 10px}#related-posts .widget h2,#related-posts h3{font:18px Oswald;color:#000;text-transform:none;margin:0 0 10px;padding:0}#related-posts a{color:#16A1E7;font:12px Verdana}#related-posts li{background:url(https://blogger.googleusercontent.com/img/b/R29vZ2xl/AVvXsEg8fuDoQrDkmgsr_72V_0iYqmtnIfndZv0oY-KPZ4ShmUfkDcUi4BSx4EcVjfW-6KmIHMn435ZMfpOsLMrE9HdrF_IK0Gx-8SGYhBEEc4cHZxZGYYumu0reY3uso74CsyEkX2KfdwQgmeE/s1600/bullet-list.gif) no-repeat 0 10px;text-indent:0;line-height:1.3em;border-bottom:1px dotted #ccc;margin:0;padding:3px 0 8px 12px}#related-posts a:hover{color:#c00;text-decoration:none}#related-posts .widget{margin:0;padding:0}#related-posts ul{list-style:none;margin:0;padding:0}
</style>
<script type='text/javascript'>
var relatedpoststitle="<h4>Artikel Mirip denngan : <a expr:href='data:post.url'><data:blog.pageName/></a></h4>";
</script>
<script type='text/javascript'>
//<![CDATA[
var relatedTitles=new Array();var relatedTitlesNum=0;var relatedUrls=new Array();function related_results_labels(c){for(var b=0;b<c.feed.entry.length;b++){var d=c.feed.entry[b];relatedTitles[relatedTitlesNum]=d.title.$t;for(var a=0;a<d.link.length;a++){if(d.link[a].rel=="alternate"){relatedUrls[relatedTitlesNum]=d.link[a].href;relatedTitlesNum++;break}}}}function removeRelatedDuplicates(){var b=new Array(0);var c=new Array(0);for(var a=0;a<relatedUrls.length;a++){if(!contains(b,relatedUrls[a])){b.length+=1;b[b.length-1]=relatedUrls[a];c.length+=1;c[c.length-1]=relatedTitles[a]}}relatedTitles=c;relatedUrls=b}function contains(b,d){for(var c=0;c<b.length;c++){if(b[c]==d){return true}}return false}function printRelatedLabels(a){for(var b=0;b<relatedUrls.length;b++){if(relatedUrls[b]==a){relatedUrls.splice(b,1);relatedTitles.splice(b,1)}}var c=Math.floor((relatedTitles.length-1)*Math.random());var b=0;if(relatedTitles.length>1){document.write("<h3>"+relatedpoststitle+"</h3>")}document.write("<ul>");while(b<relatedTitles.length&&b<20&&b<maxresults){document.write('<li><a href="'+relatedUrls[c]+'">'+relatedTitles[c]+"</a></li>");if(c<relatedTitles.length-1){c++}else{c=0}b++}document.write("</ul>");relatedUrls.splice(0,relatedUrls.length);relatedTitles.splice(0,relatedTitles.length)};
//]]>
</script>
<!--RELATEDPOSTWESLAH-->
- Continue to find the code
<div class = 'post-footer ">Add the code above:
<b:if cond='data:blog.pageType == "item"'><div id='related-posts'> <b:loop values='data:post.labels' var='label'> <b:if cond='data:label.isLast != "true"'> </b:if> <b:if cond='data:blog.pageType == "item"'> <script expr:src='"/feeds/posts/default/-/" + data:label.name + "?alt=json-in-script&callback=related_results_labels&max-results=6"' type='text/javascript'/></b:if></b:loop>
<script type='text/javascript'> var maxresults=5; removeRelatedDuplicates(); printRelatedLabels("<data:post.url/>"); </script>
</div><div class='clear'/>
</b:if>
View image:

- Click SAVE TEMPLATE
To create a related post responsive / mobile version, then we have to add the code:
@media screen and (max-width:320px){.related-posts ul{padding:0;list-style-type:none}.post blockquote{margin:5px;background:#C3C3C3;font-family:"Arial",Verdana;font-style:italic}}.post blockquote{-webkit-touch-callout:text;-webkit-user-select:text;-khtml-user-select:text;-ms-user-select:text;-moz-user-select:text}.post{-webkit-touch-callout:none;-webkit-user-select:none;-khtml-user-select:none;-ms-user-select:none;-moz-user-select:none}
above
]]></b:skin>
How to remove wrench icon in blogger
How to remove wrench icon in blogger. wrench icon that appears on the template bloggers are very influential in seo blog. If the statement is still unsure please check your blog in chkme.com. enter your blog url there, and if your blog is still there wrench_icon, then the image will show how many wrench_icon you have to mention //img1.blogblog.com/img/icon18_wrench_allbkg.png.
Without a long story, let's get to know how to remove wrench_icon on blogger
- Let's login to blogger.com
- Open the Template
- Edit html
- Find <b:include name='quickedit'/>, to facilitate the work simply press Ctrl + F paste <b:include name='quickedit'/> in the Search field: and enter
- Remove all the code <b:include name='quickedit'/> there is no template you, if it continue to save the template
There are also other ways that can be used by adding the css .quickedit {display: none;}
But if I am personally satisfied by deleting <b:include name='quickedit'/>
| How to remove wrench icon in blogger |
Without a long story, let's get to know how to remove wrench_icon on blogger
- Let's login to blogger.com
- Open the Template
- Edit html
- Find <b:include name='quickedit'/>, to facilitate the work simply press Ctrl + F paste <b:include name='quickedit'/> in the Search field: and enter
- Remove all the code <b:include name='quickedit'/> there is no template you, if it continue to save the template
There are also other ways that can be used by adding the css .quickedit {display: none;}
But if I am personally satisfied by deleting <b:include name='quickedit'/>
how to remove background image on blogger template
In the previous posts, we have discussed about "How to Change background image in blogger", and at this time we try to discuss about how to remove the background image on the default blogger template.
Actual background image on the template affects the loading speed of a blog, but basically if the template using a background image would look nicer. Due to various reasons and by taking strong decisions we finally decided to remove the background image on the blogger template.
If there are still some blogs admin who still need a tutorial on how to remove them, please follow the step by step below:
- Login to blogger
- Template> Customize> Background
- Under the Background image, there is a small town and underneath is written Remove image, please click on Remove mage. This will bring up a question Do you want to remove the background image, please click OK
- Appy to blog
This method can be used on blogs that uses blogger default template
Actual background image on the template affects the loading speed of a blog, but basically if the template using a background image would look nicer. Due to various reasons and by taking strong decisions we finally decided to remove the background image on the blogger template.
If there are still some blogs admin who still need a tutorial on how to remove them, please follow the step by step below:
- Login to blogger
- Template> Customize> Background
- Under the Background image, there is a small town and underneath is written Remove image, please click on Remove mage. This will bring up a question Do you want to remove the background image, please click OK
 |
| how to remove background image on blogger template |
- Appy to blog
This method can be used on blogs that uses blogger default template
How to change background image in blogger
When we use the default template or template blogger makers design results blogger templates, blogger templates sometimes preferred to use a background image, while we actually did not like the images used in the template ..
Well, one way out is we have to change the images used in the template database.
To change the background image on the (special blogger default template) is:
- Please login to blogger.com
- Click Template
- Customize
- Background
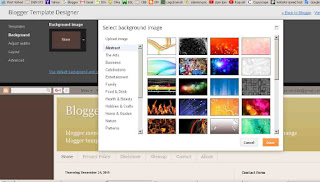
- If you clicked the background, it will show background_Select_background_image selection menu, please select the background that has been provided or simply upload your own background.
(to upload your own images please upload image)
- When you are done simply click Done, and Apply to blog
- See the results
Good luck
Well, one way out is we have to change the images used in the template database.
To change the background image on the (special blogger default template) is:
- Please login to blogger.com
- Click Template
- Customize
 |
| how to change background image in blogger |
- Background
- If you clicked the background, it will show background_Select_background_image selection menu, please select the background that has been provided or simply upload your own background.
(to upload your own images please upload image)
- When you are done simply click Done, and Apply to blog
- See the results
Good luck
Subscribe to:
Comments (Atom)